Descriptionicp

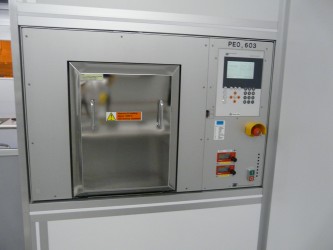
The ATV is a tube furnace that can be used for oxidation, doping and anneals. Process in-liners are used for sensitive processes to prevent cross contamination. Currently the system can support wet/dry oxidation and annealing of 4" wafers and pieces.

Low pressure processing is supported as well.

Available gases are Nitrogen and Oxygen.

Processes

Thermal Oxidation


Operating Manual

*Note that the instructions below may not contain the most recent updates. Please refer to the manuals printed and posted at the equipment.

  • The furnace gets extremely hot and remains hot hours after it has been turned off. Use extreme caution and wear the necessary heat protection.
  • Do not place your hands or other body parts inside furnace.
  • The bubbler can get very hot. Use caution.
  • The tool uses high pressure water and air.
  • The main disconnects are located in the service room to the left of the furnace and are labeled “REGLOPAS P140 CHILLER” and “PEO 603 FURNACE”
  • This furnace is only used for oxidizing silicon.
  • Silicon wafers are the only allowed material.
  • This furnace is only used for oxidizing silicon.
  • Silicon wafers are the only allowed material.

Only clean wafers out of the box or wafers that are RCA cleaned are allowed in this furnace. See the cleaning bench manual for proper cleaning procedures.

  • Be extremely careful when handling quartz ware.
  • Once unloaded, the wafers should be placed on one of the metal tables to completely cool (usually around a minute) before stored in the plastic case.
  • Do not force the door open.
  • Open and close the door slowly.
  • Never use the vacuum wand on dirty wafers. Do not touch the tip of the vacuum wand or let it touch the ground.
  • The maximum temperature for the furnace is 1050 C.
  • Turn off the water valves to the tool and chiller.
  1. Check reservations and make one. 
  2. Check utilities.
    1. Turn on “House N2” using the black quarter turn valve in the service area.
    2. Verify that the “N2 Regulator” is set to ~30 PSI.
    3. Check that the oxygen bottle pressure (pressure gauge connected directly to the bottle) is greater than 400 PSI. If it is lower than that, inform staff and reschedule your oxidation.
    4. Check that the “O2 Regulator” is set to ~30 PSI.
  3. Turn on the equipment:
  4. Turn on both sets of house cooling water supply and return valves with the four yellow handles.
  5. Turn on the REGLOPLAS+ P140smart. Rotate the red handle clock wise, then press the “ON/OFF” button once and wait for the rumbling sound indicating the pump is on.
  6. For wet oxidations only, fill the bubbler flask with de-ionized water.
    1. Do not remove anything except the fill plug. Do not attempt to remove the thermometer or the gas lines.
    2. Use only the dedicated glass funnel and glass beaker to fill the flask.
    3. Let the DI water run for at least 2 minutes before rinsing the beaker and flask, then fill the flask.
    4. Fill to slightly over the white oval on the beaker for up to 2 hrs of wet oxide.
  7. Click the green power button on the front of the ATV Furnace. Wait for the tool to turn on and for the screen to turn on and show the main screen.
  8. Turn on the bubbler power supply using the rocker switch. Press and hold the “S” button  and simultaneously press the up or down arrows to set temperature.
    1. For dry oxide, set the temperature to 18 C.
    2. For wet oxide, set the temperature to 85 C.
  9. Open WIN ATV v3 1.115 on the computer.
  10. Login: Admin
  11. Leave password blank.
  12. The last box should read “COM1”
  13. Press “OK.”
  14. From the Main screen, click on File and then Open File. Select the appropriate recipe for your project.
  15. Check that gas flows, times, and temperatures for each step in the process by clicking on each numbered step in the upper graph and then on the button to the right of the stop light. Match them to the printouts for MMF Standard Recipes.
  16. Click Program then Send. Choose a Place number.
  17. Load the furnace.
  18. Click on the “Door” button below the PEO 603 screen. Allow to purge for a minute, shown on the bottom right of the screen next to “Door purge:” When the countdown gets to zero, the door clicks audibly and unlocks.
  19. Wait for the noise indicating the door lock has released and then pull open the door very slowly and gently until it stops.
  20. Set wafers a close distance to the wand.
  21. Take out the wand.
  22. Use wand to place wafers in the furnace. Press the button on the wand to release the wafer after being placed.
  23. Push the furnace door in and hold it shut until it automatically latches.
  24. Press the Start button in the Win ATV software. It looks like a stoplight. After clicking Start, use the same Place number that you sent to the tool.
  25. Name a log file to store the run data.
  26. Monitor the process.
  27. Check that the process setpoints are working.
  28. You would need to monitor the process until it starts to cool (preferably below 300°C).
  29. If you need to abort, press the “Stop” button below the screen and then hit “Yes” on the screen.
  30. Shut down the equipment.
  31. When the chamber is below 300 C and the recipe is finished, open the door by pressing “Door.” Wait for the chamber to purge, then slide open the door.
  32. Remove your wafers using the wand.
  33. Close the door and hold it shut for ~5 s until the door latches.
  34. Turn off the bubbler.
  35. Turn off the four yellow valves for the house water.
  36. Turn off the house nitrogen.
  37. Turn off the REGLOPLAS+ P140smart by turning the red knob counterclockwise.
  38. Close WIN ATV software.
  • When several error codes appear, type in the reset error code: 5264.
  • If the door does not open, check if the House Nitrogen valve has been turned on correctly. If valve is on, the valve would be parallel to the metal tubes it faces.
  • If you click on the WINATV software and you get a message about starting an auto search, check to see if you have Regoplas and the bubbler on. Also, check to see if you have the bubbler set to the appropriate temperature.
  • If “Bubbler OverTemp” is seen after initialization,
  • If you need to abort, press the “Stop” button below the screen and then hit “Yes” on the screen.