
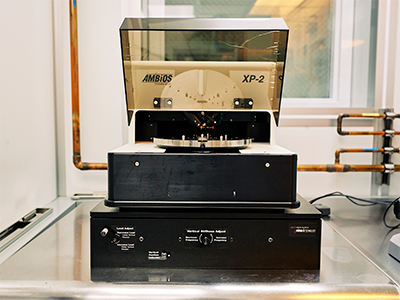
Ambios XP2
Description
Ambios XP2 is a standard stylus profilometer for measuring step heights in the tens of nm up to 400 um.
Processes
Step Height thickness measurement
- Step heights from 50A to 400um can be made using a computer controlled stylus profilometer. The stylus force can be adjusted so polymers samples such as photoresist can be measured.
Operating Manual
*Note that the instructions below may not contain the most recent updates. Please refer to the manuals printed and posted at the equipment.
Safety
- There are no major safety concerns with thistool butavoid looking at the laser.
Allowed Materials and Processes
- Cured photoresist
- Metaland dielectricstep heights
- Etch depths
- Surface roughness
- Film stress
Restricted Materials and Processes
- Never move the stage when the stylus is in contact with the sample.
- Do not measure soft,wet, gooey, or tacky samples.
- Do not ever edit the “home"or“stress” load positions. We use those to get accurate starting positions for stress measurements.
- Do not hit “Clear All” on the load positions.
- Do not measure samples that could flake and get stuck on the stylus.
- Do not attempt to measure features taller than 400um.For example, do not try to measure from the stage up to the wafer. The stylus can get caught anddamage the instrument.
- Do not loadsamples while the stage is under the measurement head. Always ensure the stage is out.
- Make sure the stylus is well above your sample surfacebefore moving the sample under the stylus.
- Do not change the stylus.
1. Startup
- Verify that the XP-2 software isopenand that the tool is onby checking that the red laser is visible on the bottom of the measurementhead.If the tool is off,close the softwareand thenturnthe toolon using the power switch on the back-left side of the instrument.Waitat least 10 sandreopen the software.Home the system when prompted. This takesseveral minutes, and afterward a message saying, “System homing is complete,” will show up. Click, “Ok.”
- Verify that the stage is empty.If it is not, email staff and remove any samples that are present.
2. Calibrate
- If you are going to measure using the 400 um or 100 um settings, loadthe 46.6 um calibration standard.Click File then Load Setup File and select “MFF-Standard-400umCal.txt.”
- If you are measuring features using the10 umsetting, load the 0.9307um standard.Click File then Load Setup File and select “MMF-Standard-10umCal.txt.
- Make sure the stylus is raised well above the calibration standardusing the Z+ button.Positionthe starting point above the measurement locationusing the X and Y buttons. You can increase the X and Y speed but do not use a fast speed for Z movement.For the400 um calibration, the top end of the step should be at the bottom of the screen.
- Slowly lower the measurement head using the Z- button. When the stylus nears the sample, the screen should getbright and the styluswill be visible coming from the right.At this point, move the stage around until you findthe feature you want to measure. Lower the stylus furtheruntilthereflectionisvisiblecoming from the left.Position the stylusabove the barbell feature on calibration standard.
- Press Scan. Confirm that the stylus landed above the correct measurement location.When the stylus is in contact with the surface, the tip and reflection will be touching, except when working on transparent materials. In that case, the tip and reflection may still beapart. Click Ok to start the scan.
- Make sure the sample is level. If not, reposition and resize the cursors and relevel. Set the R cursor to the lower level and the M cursor on top of the step.
- Right click and hit Calibrate Height.Verify that the cursors are positioned correctly and click Yes. Then enter the height of the calibration standard in Angstroms (not nm or um!).
- Raise the stylusandmove the stage outby clicking Home X/Y Stages. Carefully removeand replacethecalibration standard.
3. Load sample
- Open the cover and carefully load the sample on the stage using tweezers.
- Use the XY buttons to navigate over your sample.( Y- will move sample back toward stylus)We recommend increasing the XY speed to the maximum using the slider.
- Verify that the zoom is at the lowest setting. (You can zoom in later ifabsolutely necessary,butthisis not recommended.)
- Set theZ speed to about halfway on the slider.Lower the stageusing -Zuntil you can see the stylusand its reflection in thevideo.Watch the stylus carefully and go slowly. Do not press the stylus into the sample using the -Z button.Lower the Z speed using the slider if you need more control.
- Findthefeatureif interestusing the XY buttons, while monitoring the video to make sure the stylus does not contact the surface.
4. Scan feature
- Go to Setup,edit the speed, length, range, profile type, stylus force, and filter level appropriately.We recommend using the largest stylus force possible, 5.0 or 10.0 mg.For more detailed information onCalculations or Auto Functions, see the manual or discuss with staff.
- If you want to see where the stylus engages before running the scan,press engage.
- When scan is complete, level data.
5. Shutdown
- Press "HomeXY Stage”. This will raise the stylus and movethe stage out.
- Remove your sample.
- Close the software unless someone is going to use it immediately afterward.
- Turn off the tool using the switch on the back-left of the tool.
Stress Measurements
1. Install the stress chuck. Make sure the pins are 2.Calibrate thetool using the400 umsetting following the instructions above.
Troubleshooting
- Stage does not respond to X-, X+, Y-, or Y+ movements.
- Close software. Turn off tool using the power switch on the back left. Wait ten seconds, and then turn on the tool using the power switch. Wait another ten seconds, and then start the software. Home the system and continue.
- USB Communications Error
- Closethesoftware andthenshut off tool using power switch.Wait ten seconds and turn the tool on. Wait another ten seconds and restart the software.
- If that is unsuccessful,close the software and turn off the tool. Then restartthecomputer andlogin, username AmbiosTechnology, password Ambios@95060.
- Proceed from Step1 – Startup.
- Tool is frozen saying “Homing X-Y Stages”
- Close software and shut off tool using power switch.You may need to use Ctrl-Alt-Delete toterminate the program using the Task Manager.
- Restart computer and login, username AmbiosTechnology, password Ambios@95060.
- Proceed from Step1 – Startup.