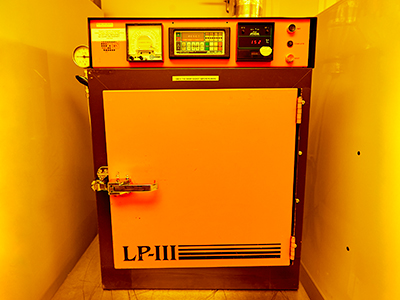
Photo of Yes 3 Vapor Prime Oven

Description

The yield engineering YES II vapor prime oven is used to coat substrates with HMDS to improve resist adhesion for standard positive photoresists.

Operating Manual

*Note that the instructions below may not contain the most recent updates. Please refer to the manuals printed and posted at the equipment.

This system is designed to strip and descum photoresist. It is a downstream plasma asher configured with oxygen, nitrogen, argon, and CF4 (tetrafluoromethane).

  • This system is safe when operated in accordance with these instructions, common sense, and general safe lab practices. However, the system has hazards that could present health and safety dangers to the operator and others if appropriate caution is not used.
  • HIGH VOLTAGE – the system operates with voltages high enough to cause death or serious injury. Never open panels or remove covers from the system.
  • ELECTROMAGNETIC RADIATION – The system produces electromagnetic radiation. Never remove covers or protective shielding.
  • GASES – The system contains compressed gases including fluorine compounds, which can be toxic or can leave toxic residues within the system. Use appropriate caution with gases.
  • MATERIALS – Etched materials or their byproducts may be toxic. Work with the tool owner to make sure your process is safe.
  • HOTPLATE – The system has a hotplate that can operate up to 250 C, capable of causing burns on contact.
  • PINCH HAZARDS – Don’t pinch yourself in the sliding chamber door.


  • The system is intended for use with: one 200 mm wafer, up to two 100 mm wafers, or pieces.
  • Smaller samples can be mounted to silicon or oxidized wafers.
  • Allowed etch targets: photoresist.
  • Allowed materials: common semiconductor materials that are vacuum compatible, but always check with the tool owner when running new processes.
  • Do not use materials other than those known as approved.
  • Do not attempt to create entirely new recipes without working the tool owner.
  • Do not run any CF4 processes without working with the tool owner.
  • All CF4 recipes must include at least three purge cycles.
  • Use care to avoid scratching the hotplate.
  • Check your recipe before running tool.
  • Do not touch the controls in the “MODE” or “LOCAL POWER” settings area on the VLF-1000 supply.
  • If you change the idle temperature, make sure to return it to 90 C before you leave.
  • Make sure your gloves are clean before you touch the screen.
  1. Log into CORAL.
  2. Equipment checks:
    1. Check that the Pro-face screen reads, “READY TO PROCESS”.
    2. Check that the hotplate is idling at 90 C. If you need to change the idle temperature, touch, “PRESS TO ENTER IDLE TEMP,” enter a temperature, and then touch, “PRESS TO RESET.” Remember to set the tool back to 90 C when you are done.
  3. Vent chamber: Click “PRESS TO VENT” to vent the chamber. The screen should read, “VENTING PROCESS CHAMBER TO ATMOSPHERE.” When the chamber reaches atmosphere and reads, “PROCESS COMPLETED”, touch, “PRESS TO RESET” to stop the alarm.
  4. Load samples: Do not force the door open before it has vented. Fully unlatch the handles and open the door. Arrange the pins for a 200 mm wafer, a single 100 mm wafer, two 100 mm wafers, or pieces. Place pins carefully so parts won’t slide off the hotplate during pump down. Carefully load your samples.
  5. Close and latch the chamber.
  6. Select recipe by pressing, “PRESS TO SELECT RECIPE,” selecting the number of the recipe you wish to use, and pressing “ENT”. The standard recipes (numbered 1 - 4) are listed below. NOTE: DO NOT save over these standard recipes. Check the recipe parameters, following the instructions listed under Recipe Editing. Recipe numbers 5 through 12 are available for users.
  7. Start process by touching, “PRESS TO START PROCESS”.
  8. Observe process. The screen reads, “VACUUM ON: WAITING TO REACH BASE PRESSURE,” which is set to 75 mTorr on the G.P. Chamber Pressure gauge. Then it will display, “PURGING CHAMBER WITH PROCESS GAS” for about 30 seconds. At this point the tool will run the selected gas at the process pressure, as measured on the CDG Chamber Pressure gauge. Then it will read “RF POWER ON: PROCESS STEP”, and you can monitor the countdown timer. At the end of the process, the chamber will automatically vent. If you need to abort a process, touch, “PRESS TO RESET.”
  9. Remove samples: After the system has vented and reads, “PROCESS COMPLETE,” press, “PRESS TO RESET” to silence the alarm. Then unload the chamber by unlatching the handles, pulling out the hotplate, and removing your samples.
  10. Close and latch the chamber.
  11. When finished, pump down chamber: Using any process except 0 and 13, start a process to begin pumping chamber, monitor the C.G. Chamber Pressure gauge, and hit, “PRESS TO RESET SYSTEM,” when the gauge reads less than 20 Torr (reset will stop pumping and valve off chamber for idle).
  12. Log out of CORAL.
  1. Pressure low trip point: 300 mTorr
    1. Check that gas bottles are open and have gas. If the O2 is out, shut the tool down in CORAL. If any other gas is down, report it as a problem in CORAL.
  2. Pressure high trip point: 1.5 Torr
    1. Shut the tool down in CORAL.

If anyone is in serious danger or the tool is smoking or on fire, press the red EMO button on the front of the tool and evacuate the area.

  1. Press, “ACCESS.” Then touch, “PRESS TO ENTER ACCESS CODE,” enter 1966, and hit “ENT”.
  2. Click, “GOTO RECIPE SET UP PANEL.” The second page, accessed by touching, “GOTO RECIPE SET UP CONTINUED,” shows what recipe you are looking at and shows some process variables. Load a recipe to edit by going to the second page, touching, “PRESS TO SELECT RECIPE,” selecting a recipe to edit and touching, “PRESS TO LOAD RECIPE.” The first page displays gas flows, power set points, process pressure, and recipe time. Work with the tool owner to develop processes. Once you have checked or edited your recipe, go the second page and touch, “EXIT”.